Hi Guys,
I wanted to write a short post on the things I encountered when upgrading my Hyper-V Nutanix blocks to the latest NOS 3.5.4. The following information is provided “as is”, I have found it to work in my environment but I am not an official employee for Nutanix or Microsoft.
The general setup I am working with exists of 2 Nutanix clusters, both running NOS 3.5.3.1, the main reason I was pretty happy with the NOS 3.5.4 release is because it now includes VSS support for Hyper-V. The following information can be retrieved from the release notes:
- Volume Shadow Copy Service (VSS) support for Hyper-V hosts [FEAT-632]
- Since the Microsoft VSS framework requires a full share backup for every virtual disk contained in the share, Nutanix recommends that customers plan their environment to accommodate no more than 20 virtual disks per SMB share for optimal backup performance. Going beyond the limit might result in unpredictable behavior such as backups failing. Multiple SMB shares are therefore recommended for environments with a large number of virtual disks.
I won’t be discussing the real upgrade steps, since these are already covered in the upgrade guide, however I will be explaining the post-installation tasks you have to do in order to join the Nutanix storage to Active Directory, changes to GFLAGS and a quick comparison of the Nutanix diagnostics.py results between NOS 3.5.3.1 and NOS 3.5.4.
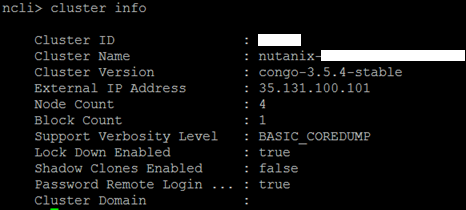
Start op an SSH session and issue the “cluster info” command through the ncli and write down the cluster name.
The following commands pre-creates a computer account in AD. According to nutanix this is only supported with a server 2012 domain controller with a server 2012 domain functional level, I don’t see why since this works perfectly with a 2008 R2 domain controller and i’m even running server 2003 domain functional level. The key here is to have any member server running at least powershell 3 and has the active directory modules loaded (these can be found in the RSAT feature tools).
Replace fqdn, clustername and clusterip to your corresponding environment:
#adds a DNS-entry for your cluster with it’s IP
dnscmd.exe /recordadd ‘fqdn’ ‘clustername’ ‘A’ ‘clusterip’
#prompts for a password for the nutanix storage computer object
$password=(get-credential -username ‘clustername.fqdn’ -message “Please enter a password for the Nutanix storage computer object”).password#pre-creates the nutanix storage computer object
New-ADComputer -Name clustername -SAMAccountName clustername -UserPrincipalName clustername@fqdn -PasswordNeverExpires:$true -cannotChangePassword:$true -AccountPassword $password -DisplayName ‘Nutanix storage cluster on clustername’ -Description ‘Nutanix storage cluster on clustername’ -DNSHostName clustername.fqdn
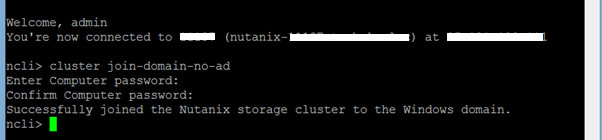
Now that the account was pre-created, we still need to attach it using the nutanix ncli:
Additionally you need to change a GFLAG setting for both clusters, note that this is a cluster-wide setting and is necessary to improve overall VSS performance, contact Nutanix support to have this changed for you.
I also kept track of the diagnostics output between NOS 3.5.3.1 and NOS 3.5.4. This really shows that the power is truly in the software, I’m already looking forward to the NOS 4.0 release, from what i’ve heard there will be another performance boost on the Hyper-V platform.
The following table lists the different diagnostics outputs before and after the upgrade on a NX-1450:
| NUTANIX CLUSTER | ||
| NOS 3.5.3.1 | NOS 3.5.4 | |
| Sequential write bandwidth (MBps) | 447 | 542 |
| Sequential read bandwidth (MBps) | 1757 | 1764 |
| Random read (IOPS) | 49496 | 54343 |
| Random write (IOPS) | 22367 | 27696 |
As you can see my random write IOPS are 20% faster and the random read IOPS almost 10% faster, this all thanks to the software upgrade. Do note that you have interpret these values as a total number of IOPS in the cluster, mine consists of 4 nodes so in average you could say I can reach up to 13585 random read IOPS and 6924 random write IOPS per node!
That’s it. If you run into any problems, do contact Nutanix support, I must admit they have the best support I have ever encountered with. Thumbs up and keep up the good work!
I will try to cover the integration, maybe some best-practices with Veeam V7 in a next blog.
UPDATE
I had a nice chat with Nutanix support, they provided me with the following information which explaines why we can see a 20% of increase in performance. They have adapted the power plan settings in Server 2012 R2 to high performance.
If the cluster is running 3.5.4 the power profile should be already high performance. You can check it with:
“powercfg -l”
The same can be done in powershell ofcourse:
$targetServers = ‘ntnx-1′,’ntnx-2′,’ntnx-3′,’ntnx-4’
Invoke-Command -ComputerName $targetServers {
Try {
# No need to check if its currently active
powercfg -SETACTIVE SCHEME_MIN
} Catch {
Write-Warning -Message “Unable to set power plan to high performance”
}
# Print power setting
hostname
powercfg -getactivescheme
}

Davy
